
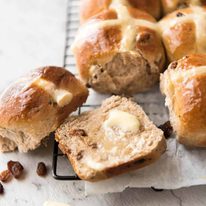
Fluffy, fragrant, homemade Hot Cross Buns recipe! With a how-to video and some cheeky but effective tips, I think you’ll be amazed how easy it is to make hot cross buns. BONUS: a no-knead version – the world’s easiest hot cross buns recipe!
Discover more Easter food in my Easter super collection – I’ve organised it by course.
Hot Cross Buns
Big, fluffy, fragrant Hot Cross Buns just like what you get from your favourite bakery are easier to make than you think. Especially if you have a stand mixer or food processor. Homemade Hot Cross Buns become a dump-and-mix job to make the dough. Definitely my preferred method!
But – I know the idea of making a recipe involving yeast can make some people hesitate if it’s not something you ordinarily do. I get it. I used to be you.
But here’s the thing about homemade Hot Cross Buns. The ones you buy from regular grocery stores will never, ever taste as good because you can’t retain the freshness of the spices in Hot Cross Buns. Plus, the more economical ones have a distinct artificial flavour in them from the preservatives.
Once you’ve tried homemade, it’s hard to go back!! (BONUS: Make the dough today, bake them fresh tomorrow.)
What you need for Hot Cross Buns
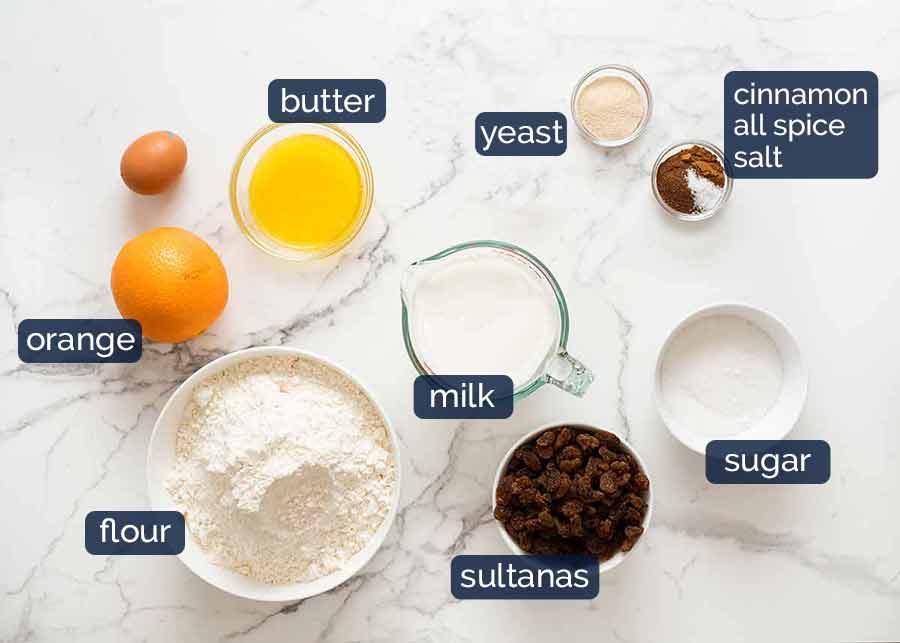
Here’s what goes into homemade Hot Cross Buns. You can make this recipe with any type of yeast – rapid rise, instant, active dry or even fresh yeast. Directions have been provided for all.
Different types of yeast – use any
There are 3 different types of yeast and you can use any of these to make Hot Cross Buns:
active dry / dry yeast – yeast in powder form that is best used after dissolving in warm liquid then left to get foamy before mixing in dry ingredients (like for Bread Rolls)
instant yeast / rapid rise yeast (used in this recipe) – this yeast makes the dough rise faster and does not need to be dissolved in liquid first, just mix everything at the same time;
fresh yeast – comes in block form, just crumble and dissolve in liquid.
Hot Cross Buns – Choose from 3 Methods
In this Hot Cross Buns recipe, I’m going to give you three different ways to make the dough:
stand mixer – easiest, my default way (or food processor with dough blade);
kneading by hand – takes 10 minutes, and requires decent arm strength; or
simple no knead version – all you need is a bowl, wooden spoon and 1 minute of easy stirring. The easiest method of all, this will make buns that are ever so slightly less fluffy and do not keep quite as well. But it is a small compromise for the effort you will save!
Method #1 and #2 is recommended for best results, #3 is the easiest.
How to make Hot Cross Buns
PART 1 – THE DOUGH
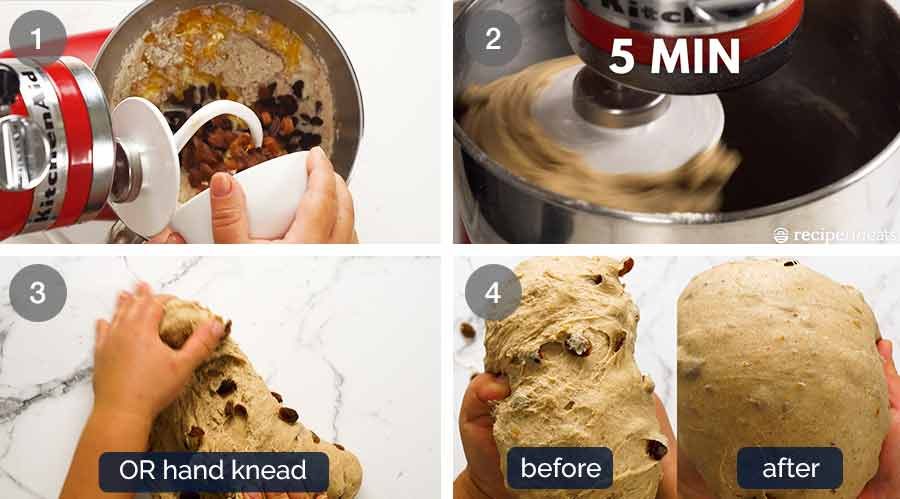
This is an easy method where you simple put all the dough ingredients in a bowl, then mix on speed 2 for 5 minutes OR knead by hand for about 10 minutes.
Your dough is ready when it is smooth and elastic – see #4 below for a Before and After Kneading comparison.
PART 2 – RISE
Once the dough is smooth, place it in a bowl, cover with cling wrap* then leave it in a warm place until it doubles in size. This takes me 1.5 hours in a warm ~25°C/77°F location. My no-fail place is the dryer! Run it (empty) for 3 minutes, then turn it off and put the bowl inside. Warm and wind free – perfect dough rising conditions!
* I know cling wrap isn’t an environmentally option, but it really is the most effective and safest. Wet towel gets cold which can compromise the dough rising, a plate or pot lid doesn’t seal enough to trap warmth and humidity.
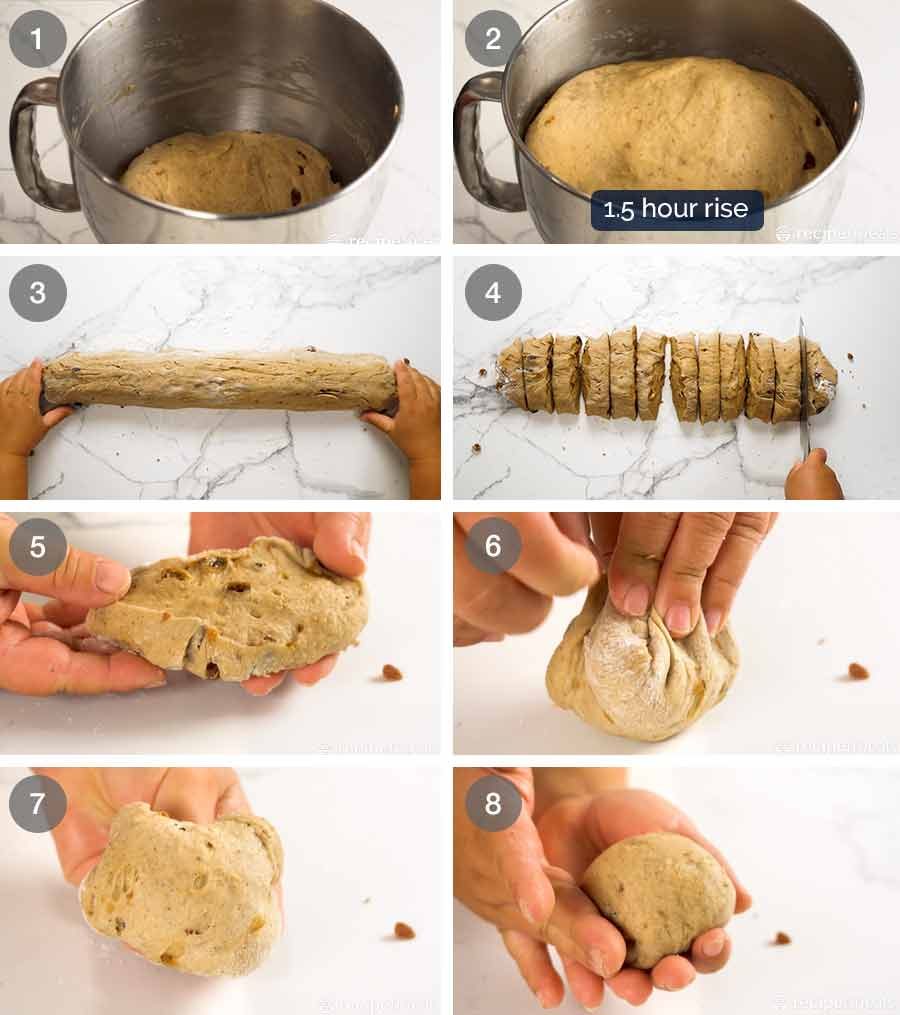
PART 3 – FORM BALLS
To form the balls that bake into smooth round Hot Cross Buns, I find the best method is as follows:
Shape dough into log, cut into 12 pieces;
Take a piece, then bundle it up like a moneybag – this will stretch one side into a smooth round dome; and
roll/press/shape into a neat ball, the place the ball into the baking pan smooth side up.
PART 4 – Rise #2
Spray cling wrap with oil, then loosely drape over the buns. Leave for 40 minutes until they almost double in size – about 75% is enough.
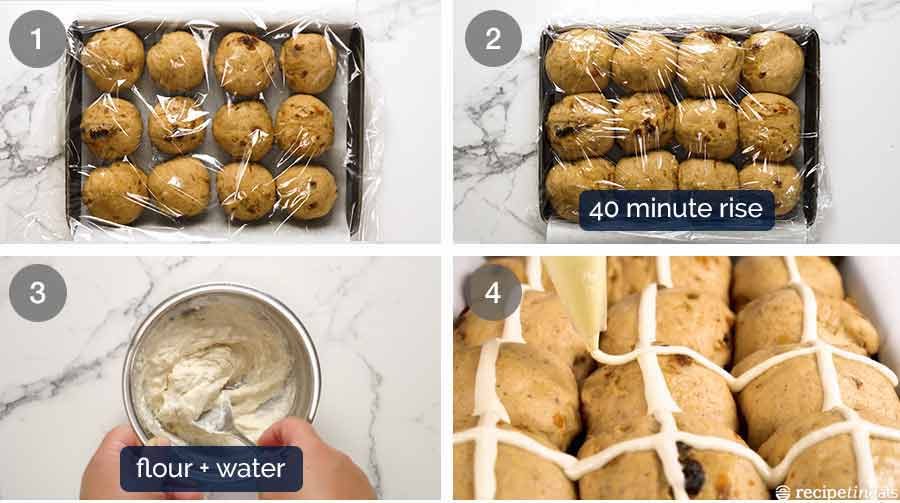
PART 5 – HOW TO MAKE THE CROSSES for Hot Cross Buns
Simple mix of water and flour, the trick is ensuring it is the right consistency. Too thin, and it will run everywhere when it’s in the oven. Too thick, and you end up with crispy, hard sprigs on the surface of your soft buns!
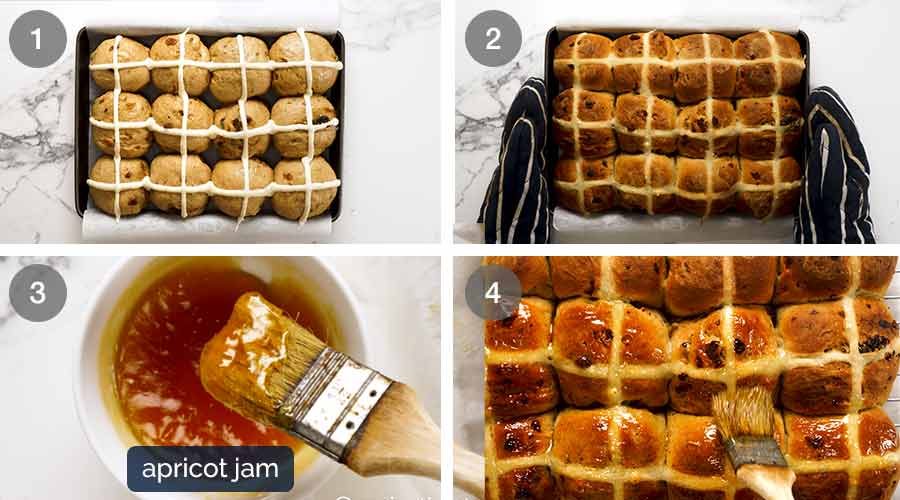
PART 6 – BAKE!
Bake for 22 minutes or until the buns are a deep golden brown. I find that colour is the best indicator for this recipe. Pale = undercooked. Burnt = 😩
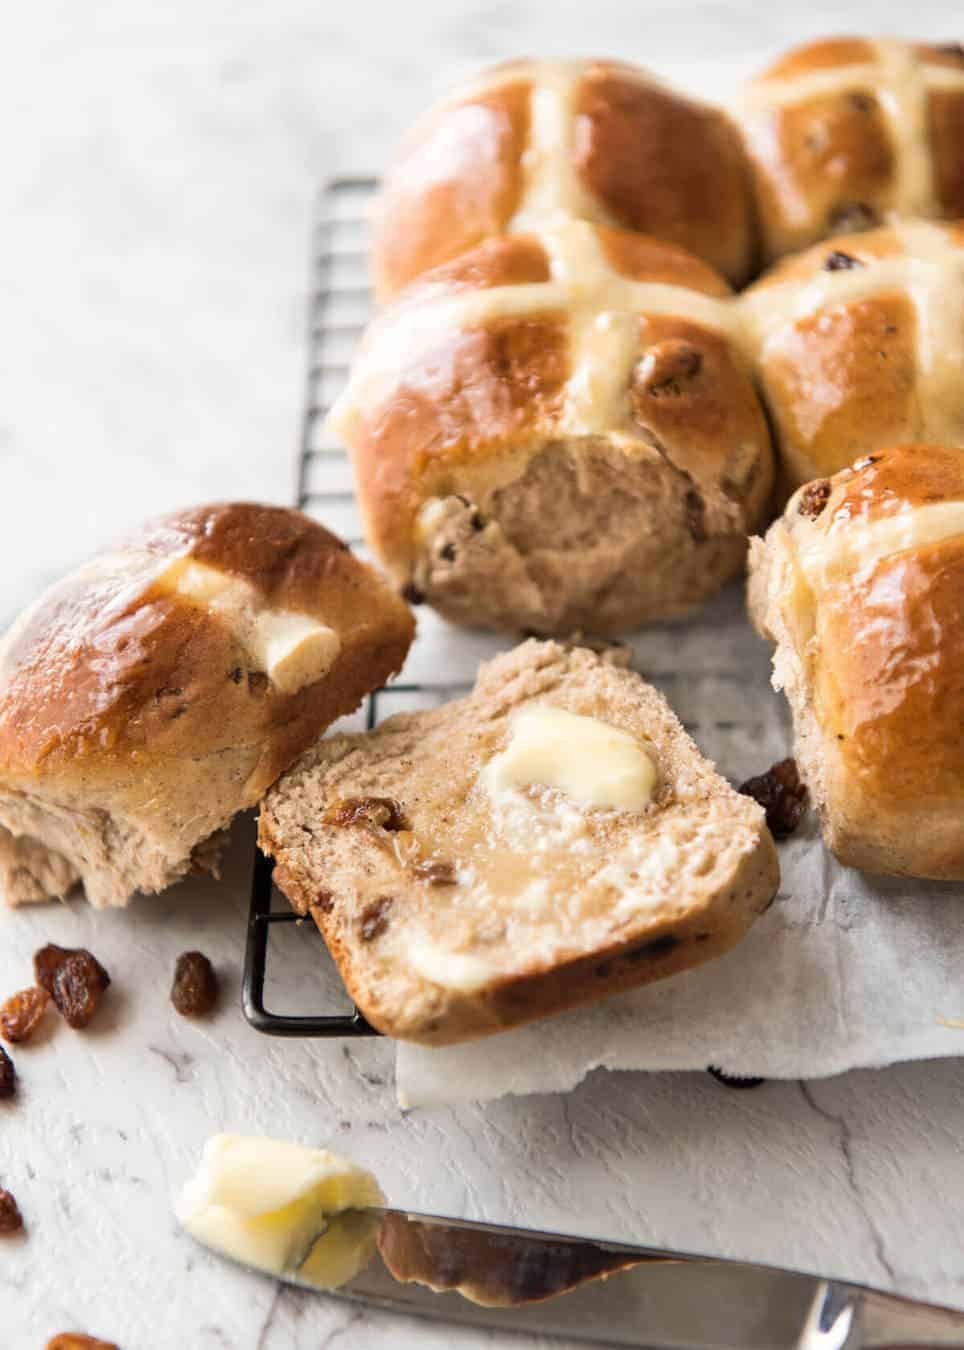
PART 7 – GLOSS!
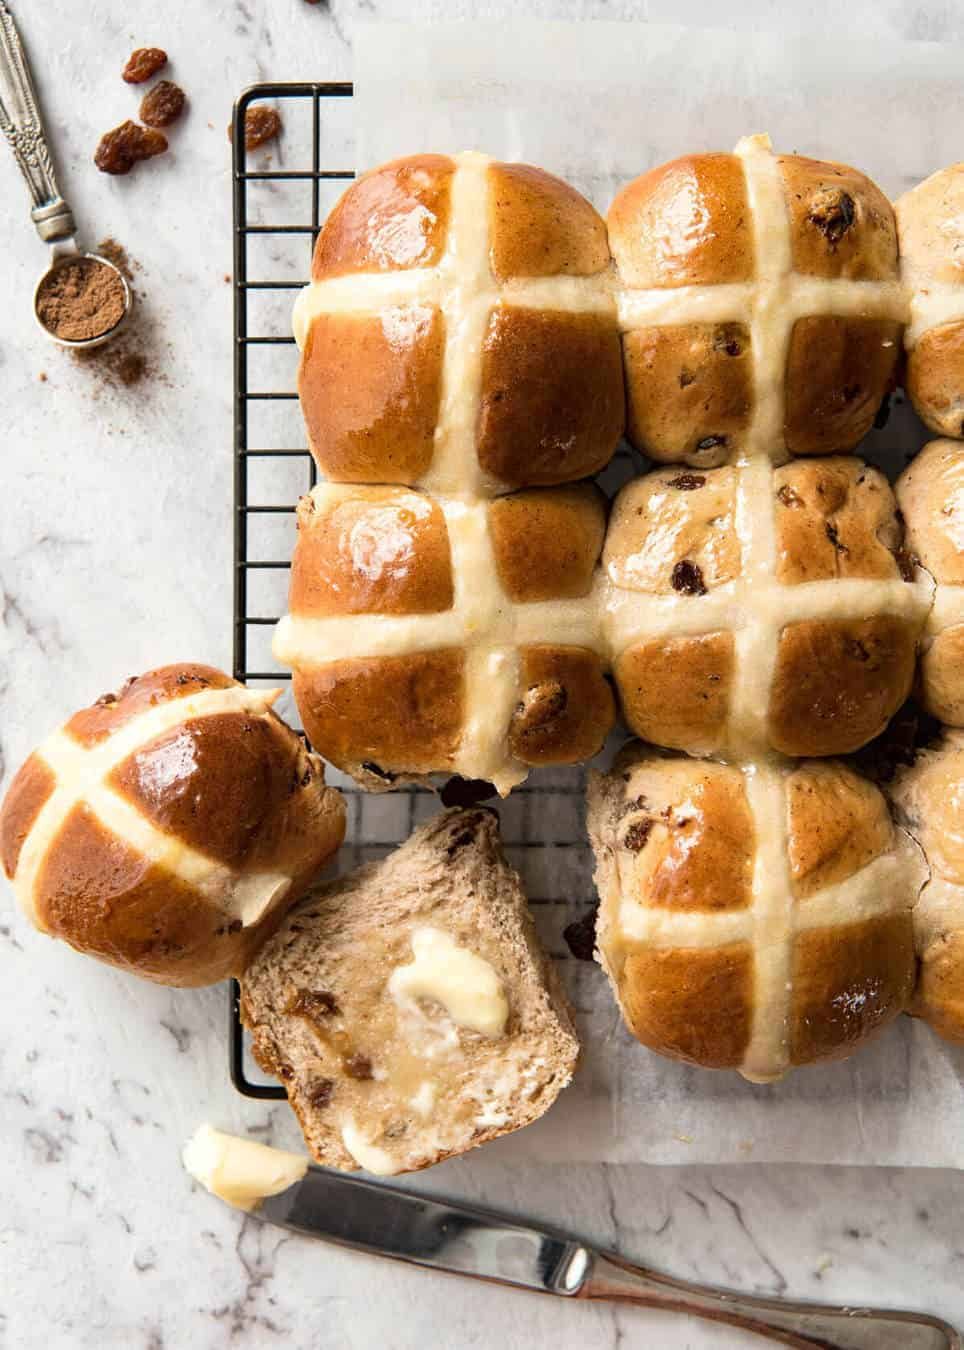
The lovely shiny finish on Hot Cross Buns is simply a mix of heated apricot jam and a touch of water. Just microwave to heat, mix until smooth then lightly brush onto the surface.
Substitute with other jams, or honey, maple syrup, golden syrup or other shiny syrups.
Tips for the BEST Hot Cross Buns!
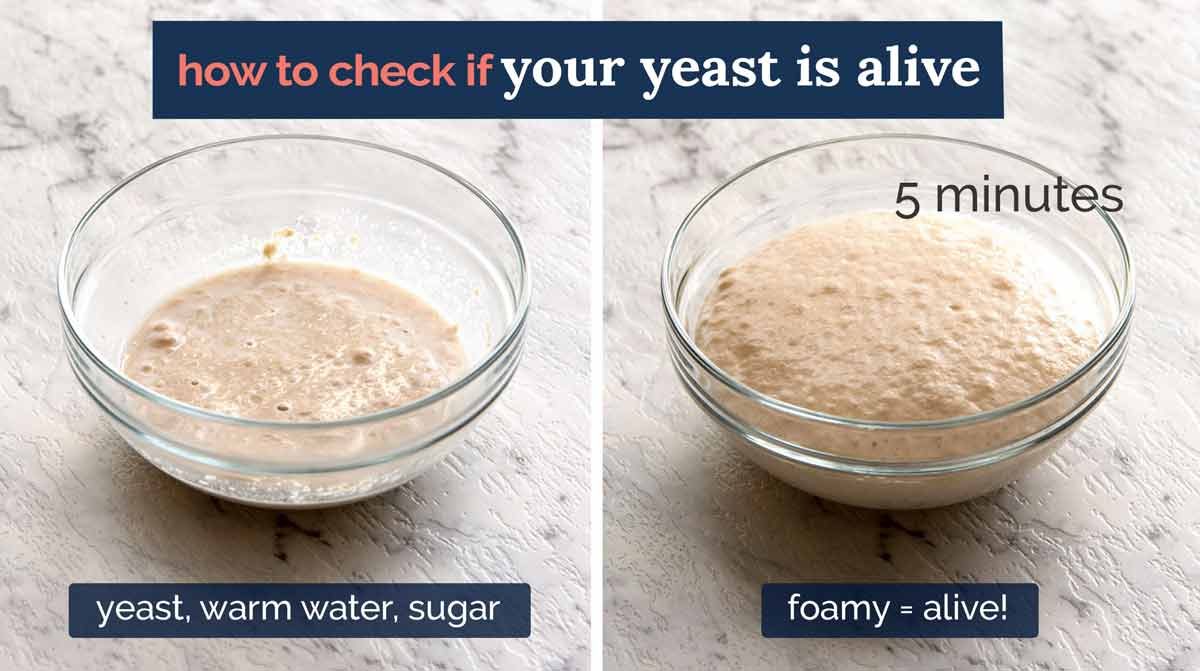
CHECK YOUR YEAST expiry date – The #1 problem because most people don’t bake with yeast very often, and yeast does go off! If your yeast is past its expiry date OR you’ve kept it in hot humid conditions (instead of fridge or freezer), your dough will not rise.
How to test your yeast is still alive – in tiny bowl, mix 2 tbsp very warm tap water with pinch of sugar and 1/4 tsp yeast. Leave in very warm place for 5 – 10 min. If surface gets foamy like the below, your yeast is alive and fine to use.
Dough consistency is key. The stickier the dough, the softer and more moist your buns will be because soft dough = easier rise. So you need to use the minimum amount of flour you can get away with so the dough pulls away from the side of the bowl when mixing, but is still soft.
Too much flour = dry hard dough = no rise = buns as hard as rocks
Start with less flour – it’s easier to add more flour to get the right dough consistency, rather than trying to salvage dough that’s too dry by mixing in more liquid. So this recipe starts with 4 1/4 cups of flour which should be a touch under what you actually need, then calls for adding up to 1/4 cup Extra Flour so it’s not too sticky;
Humidity, weather and flour brand all affect the exact amount of flour you need. I use the full Extra 1/4 cup flour in summer (hot, humid, warmer dough = stickier & softer)) and I often do not add any Extra flour in winter (cold = dough cools faster = less sticky).
Smooth dough – see above and in the short recipe video below for a before/after kneading comparison of how the dough should look. If you don’t knead enough, your buns will not be soft and fluffy!
No stand mixer and can’t be bothered to hand knead? Use the No Knead Hot Cross Buns method provided! Read more about it below.
No yeast? Sorry, this recipe won’t work without yeast!
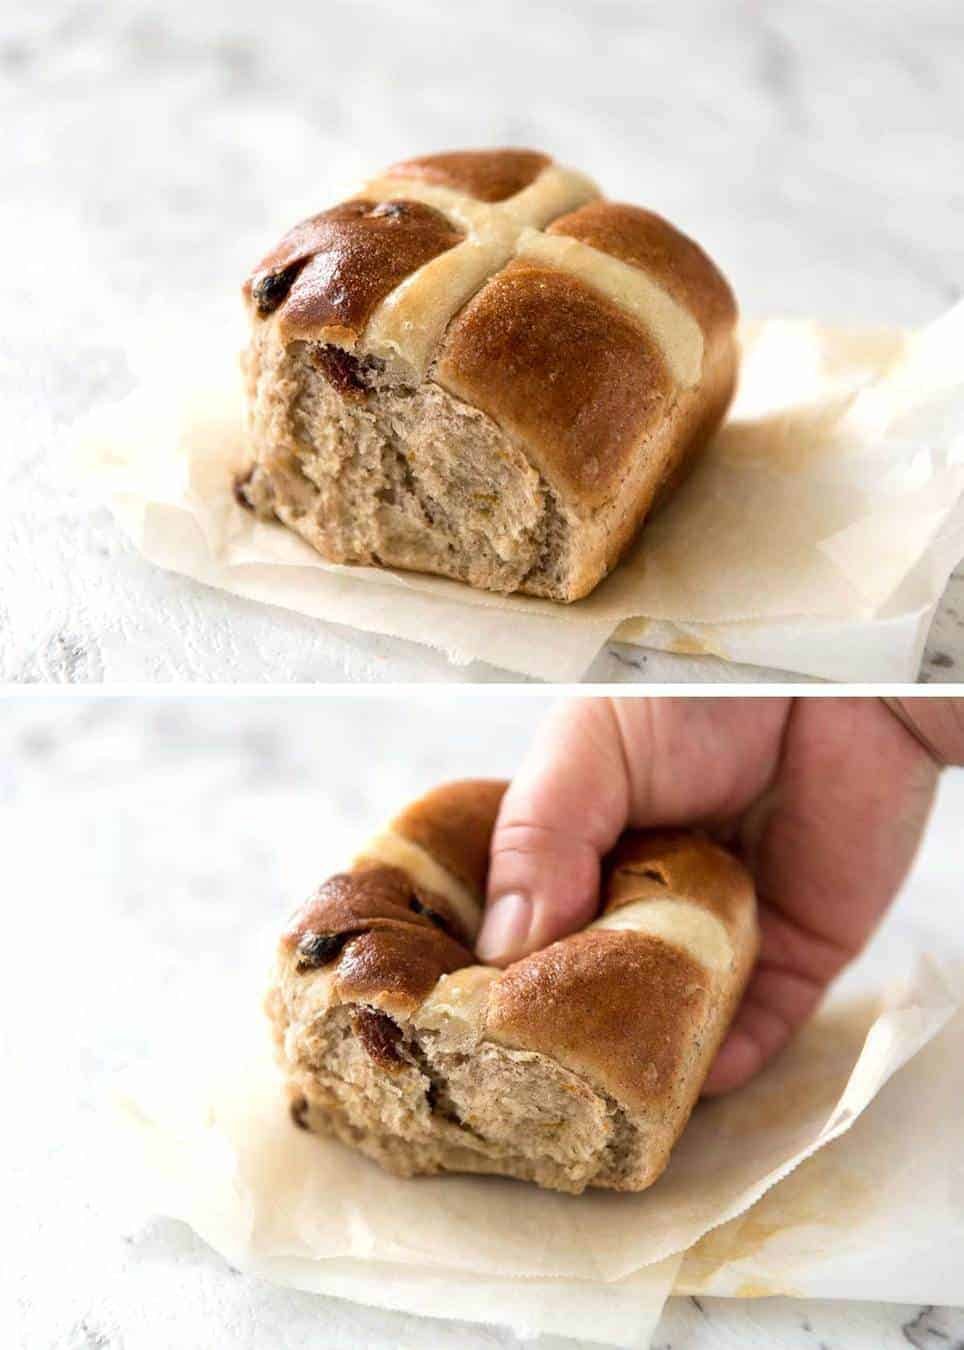
Don’t skip cooling the buns – I know, I know, you want to rip into these buns when they’re fresh out of the oven. But don’t! If you do, they will seem doughy inside. They look cooked, but have a doughy texture when you bite into it. They need 20 minutes to finish cooking / dry out the inside.
Ultra-easy option: No-knead Hot Cross Buns
This is the easiest way to make Hot Cross Buns, and I’ve provided it as an extra recipe at the very bottom of this post.
No-knead Hot Cross Buns are exactly as the name says – Hot Cross Buns that are made without kneading the dough, based on the reader favourite no-knead bread rolls recipe. The dough mixture is looser, almost like a thick muffin batter, that you mix with a wooden spoon, then leave it to rise and proceed with the same steps as above.
The end result is marginally different to the kneaded version. The buns rise a touch less, and they do not keep as well – they are a bit drier the next day.
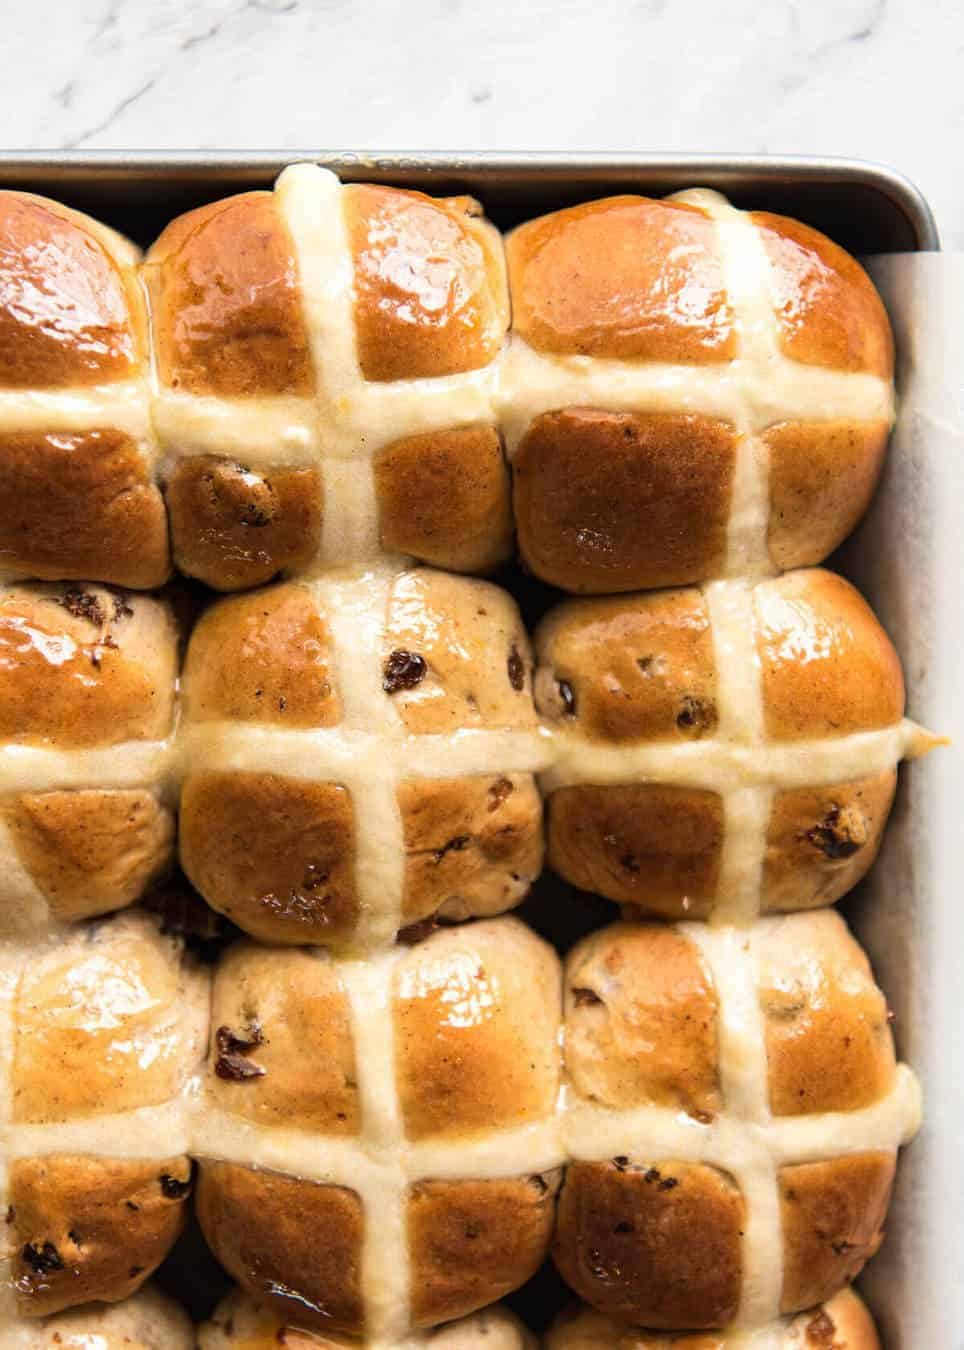
I say that do not rise quite as much, but they’re still super soft and fluffy. See?
There are very few things in this world that can rival the smell of freshly baked homemade Hot Cross Buns, fresh out of the oven.
It’s a smell we only get to enjoy once a year, around Easter. So let’s make the most of it! – Nagi xx
Watch how to make it
Hot Cross Buns recipe video! NOTE: This is for the classic kneaded Hot Cross Buns, not the No Knead version. For the No Knead Hot Cross buns, see recipe intro for links to relevant video.
Hungry for more? Subscribe to my newsletter and follow along on Facebook, Pinterest and Instagram for all of the latest updates.
Hot Cross Buns recipe
Ingredients
Buns:
- 3 teaspoons instant or rapid rise yeast (9 grams) , Note 1, CHECK still active!
- 1/2 cup (110g) caster sugar (superfine sugar)
- 1 1/2 cups (375ml) milk, warm , full fat or low fat (Note 2)
- 4 1/4 cups (640g) bread flour (or plain / all purpose) (Note 3)
- 2 tsp cinnamon powder
- 2 tsp All Spice OR Mixed Spice (Note 4)
- 1/2 tsp salt
- 1 1/2 cups (210g) sultanas (Note 4)
- 1 – 2 oranges, zest only (Note 4)
- 50g / 3.5 tbsp unsalted butter, melted and cooled
- 1 egg , at room temperature
Extra Flour for dough
- 1/4 cup (35g) Extra bread flour
Crosses:
- 1/2 cup (75g) flour (any white flour)
- 5 tbsp water
Glaze:
- 1 tbsp apricot jam (Note 7)
- 2 tsp water
Instructions
- Mix dry – Place flour, yeast, sugar, all spice, cinnamon, and salt in a large bowl. Briefly mix with stand mixer fitted with a dough hook.
- Add wet – Add butter, milk, egg, sultanas and zest.
- Standmixer: Mix for 5 minutes until a smooth elastic dough forms. Start on speed 2 then once the ingredients are combined, increase to speed 4. After 1 minute, add extra flour if required, just enough so dough comes away from side of bowl when mixing and doesn't stick terribly to your fingers. (Note 5).
- Hand kneading: Alternatively, dust a work surface with flour and knead by hand for 10 minutes.
- Dough is kneaded enough when it's smooth and does not break when stretched – see photos & video for before/after comparison.
Rise #1:
- Leave dough in the bowl, cover with cling wrap and place in a warm, wind free place to rise until doubled in size. This will take anywhere between 30 minutes to 1 1/2 hours depending on how warm it is – see Note 6.
Forming Balls (watch video, it’s helpful):
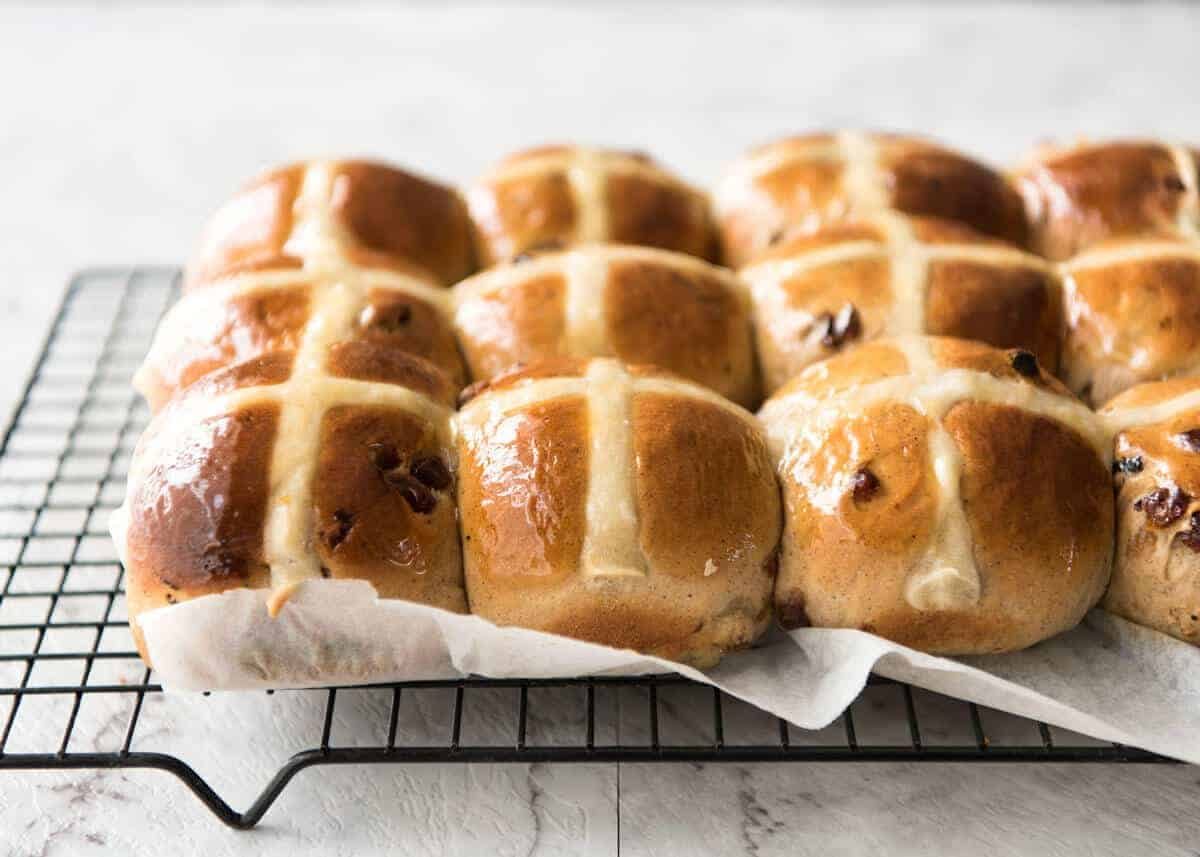
- Line a 31.5 x 23.5 cm / 9 x 13″ tray with baking paper with overhang.
- Remove cling wrap and punch dough to deflate.
- Dust work surface with flour, place dough on work surface, shape into a log – this will deflate the air. Cut into 12 equal pieces.
- Take one piece and press down with palm, then use your fingers to gather into a ball, then roll the dough briefly to form a ball. This stretches the dough on one side and that’s how I get a nice smooth surface.
- Place the ball with the smooth side up on the tray. Repeat with remaining dough. Line them up 3 x 4.
Rise # 2:
- Spray a piece of cling wrap lightly with oil (any), then loosely place over the tray.
- Return tray to warm place and leaver 30 – 45 minutes, until the dough has risen by about 75% (less than double in size).
- Partway through Rise #2, preheat oven to 180°C/350°F (all oven types).
Crosses:
- Mix flour and water until a thick runny paste forms – see video for thickness required.
- Spoon into a round 3 mm piping bag or small ziplock bag then snip corner.
- Remove the cling wrap and pipe crosses onto the buns. Go slow so it hugs the curves.
Baking/Glaze:
- Bake in preheated oven (180°C/350°F) for 22 minutes, or until the surface is a deep golden brown. The surface colour is the best test for this recipe.
- Meanwhile, place jam and water in a bowl, microwave for 30 seconds. Mix to combine.
- Remove buns from oven. Use overhang to lift buns onto a cooling rack.
- Brush with jam mixture while warm. Allow to cool to warm before serving.
Recipe Notes:
- mix yeast, 2 teaspoons of the sugar and all the warm milk in the bowl, then leave 5 – 10 minutes until surface gets foamy;
- add all the other ingredients (including remaining sugar minus the 2 tsp used above), then mix/knead per recipe; and
- proceed with recipe as written.
- Spices – All Spice is my default, but I also use Mixed Spice too and no one would ever know the difference. Sub with: 1 tsp cinnamon, 1/2 tsp each cloves and nutmeg
- Sultanas: Some recipes say to add sultanas after the dough has been kneaded or risen. If you do this, you’ll find it very hard to disperse them evenly throughout the dough. By adding them before kneading, some do get squished. But it’s not noticeable in the end result.
- Orange – use 2 oranges if you want a more prominent orange flavour, or switch for 1/2 cup candied citrus peel.
- Choc chips! Use 2 cups instead of the sultanas (any more and you end up with quite a gooey melted chocolate centre!)
- Make today, bake tomorrow – Do Rise #1 then follow steps to form the balls per the recipe and place in tray, ready to do Rise #2. Except put it in the fridge instead. Leave overnight. Then remove from fridge and put it in a very warm place. Once the fridge chill is gone and the dough is back at room temperature, it will then start the Rise #2 as per the recipe. It takes 2.5 – 3.5 hrs to finish Rise #2 after taking it out of the fridge. Then bake per recipe! (Bonus: They are even tastier if you make ahead because the dough develops flavour overnight!)
- Best served on day it’s baked: As with all homemade bread, it is best served on the day it’s baked. Stays fresher and softer if you use bread flour.
- For the day after, reheating makes all the difference to make them soft and moist again – 15 sec in the microwave! These freeze great, then just defrost. To reheat batches, I pop them on a tray and cover with foil (to avoid the surface getting too crisp), then reheat at 160C/320F for 8 minutes or so.
Nutrition Information:
Hungry for more? Subscribe to my newsletter and follow along on Facebook, Pinterest and Instagram for all of the latest updates.
NO-KNEAD Hot Cross Buns (so effortless!)
Ingredients
Buns:
- 1 tablespoon dry yeast – any type (active dry, rapid rise, instant) (Note 1)
- 1/2 cup (110g) caster sugar (superfine sugar), or sub with normal white sugar
- 1/2cup (125 ml) warm water (Note 2)
- 1 cup (250 ml) milk, lukewarm, whole or low fat, (Note 2)
- 4 cups (600g) bread flour + extra for dusting (Note 3)
- 2 tsp cinnamon powder
- 2 tsp All Spice OR Mixed Spice
- 1/2 tsp salt
- 1 – 2 oranges , zest only (Note 4)
- 1 1/2 cups (210g) sultanas (Note 4)
- 50g/ 3.5 tbsp unsalted butter, melted and cooled
- 2 eggs, at room temperature, lightly beaten with fork
Crosses:
- 1/2 cup flour, any white flour
- 5 tbsp water
Glaze:
- 1 tbsp apricot jam
- 2 tsp water
Instructions
- Place the yeast and 2 teaspoons of the sugar in a medium bowl, then pour in water. Leave for 5 minutes until it froths.
- Place flour, remaining sugar, salt and spices in a bowl. Whisk to combine.
- Make a well in the centre. Add remaining Buns ingredients and pour in the yeast liquid, including all froth.
- Mix until combined with wooden spoon – it will be like a thick muffin batter. Not pourable, but thick and sticky.
Rise #1:
- Leave dough in the bowl, cover with a wet (clean) tea towel and place in a warm place to rise for around 1 1/2 – 2 hours. See Note 5 for how I do this (you will laugh – but it works every time!). The dough will triple in size and be bubbly on the surface.
Forming Balls (watch video, it’s helpful):
- Line a 31.5 x 23.5 cm / 9 x 13″ tray with baking paper with overhang.
- Remove tea towel and punch dough to deflate.
- Dust work surface with flour, place dough on work surface. Dust top of dough then knead lightly (to deflating air) and shape into a log. Cut into 12 equal pieces.
- Take one piece and press down with palm, then use your fingers to gather into a ball, then roll the dough briefly to form a ball. This stretches the dough on one side and that’s how I get a nice smooth surface.
- Place the ball with the smooth side up on the tray. Repeat with remaining dough. Line them up 3 x 4.
Rise # 2:
- Spray a piece of cling wrap lightly with oil (any), then place over the tray.
- Return tray to warm place and leave for 45 min – 1 hour, until the dough has risen by about 75% (less than double in size).
- Partway through Rise #2, preheat oven to 180C/350F (all oven types).
Crosses:
- Mix flour and water until a runny paste forms – see video for thickness required.
- Spoon into a round 3 mm piping bag or small ziplock bag then snip corner.
- Remove the cling wrap and pipe crosses onto the buns. Go slow so it hugs the curves.
Baking/Glaze:
- Bake for 22 minutes, or until the surface is a deep golden brown. The surface colour is the best test for this recipe.
- Meanwhile, place jam and water in a bowl, microwave for 30 seconds. Mix to combine.
- Remove buns from oven. Brush with jam mixture while warm.
- Use overhang to lift buns onto a cooling rack. Allow to cool to warm before serving.
Recipe Notes:
- Spices – All Spice is my default, but I also use Mixed Spice too and no one would ever know the difference. Sub with: 1 tsp cinnamon, 1/2 tsp each cloves and nutmeg
- Sultanas: Some recipes say to add sultanas after the dough has been kneaded or risen. If you do this, you’ll find it very hard to disperse them evenly throughout the dough. By adding them before kneading, some do get squished. But it’s not noticeable in the end result.
- Orange – use 2 oranges if you want a more prominent orange flavour, or switch for 1/2 cup candied citrus peel.
Nutrition Information:
Originally published March 2017, updated April 2020 with a brand new video and new process steps.
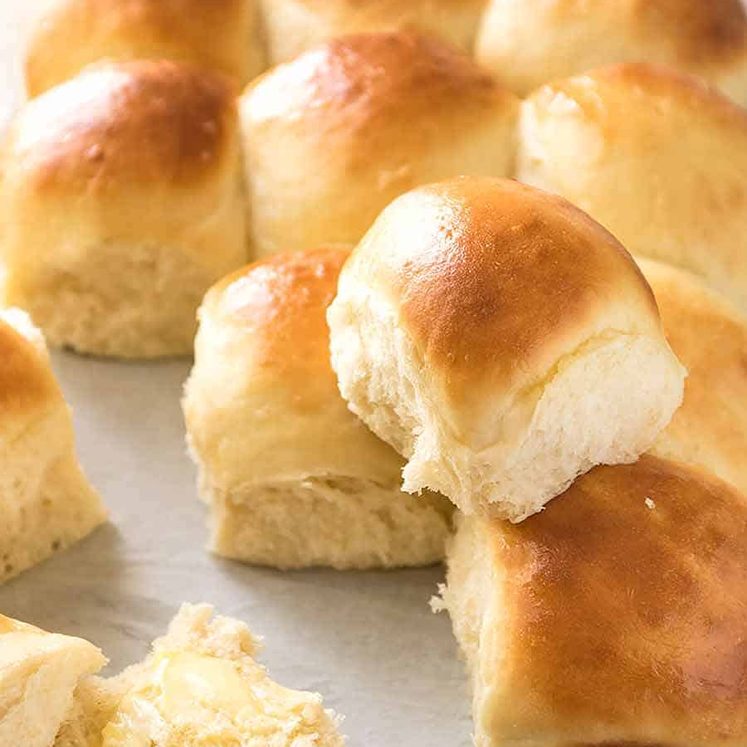
Most Popular Bread recipes!


Life of Dozer
Don’t worry! It’s a dog friendly Easter egg!!

I learned a trick for kneading in a kitchen that had counters built too high for me in a house with no stand mixer – I threw the dough into my largest bowl and put it on the floor. Kneeling in front of it, gives you all the weight of your body kneading and it goes rather fast that way.
YESS!!! I do that on the kitchen table which is a good deal lower than my counter!! 🙂
Recipe forwarded to wifey. She’s the baker in the fam. Mum lands next week for a long break. This is going to be a fun Easter. Thanks Nagi! XX
Oooh! Hope wifey approves! 😉
Great recipe Nagi. Loved the tip about using the dryer. I never would have thought of it!
I’m almost ready to bake but I know they will turn out beautifully.
I’ve made your Shawarma chicken recipe several times also.
Keep em coming. Thanks so much.
Oooh! So glad you love the Shawarma, it’s one of my favourite recipes! Hope you love the HX Buns! N xx
Never in a million years would have thought to make my own hot cross buns but you’ve convinced me it’s a great idea! can’t wait to try out your recipe ASAP!!
I hope you give it a go! They really are just so incredible 🙂 N xx
Made these last night. This was my first time making my own bread, and it was a success! I didn’t end up using the flour/water mixture to make the crosses because it was already past midnight and at that point I just wanted to get the buns in the oven (see what I did there?) This is also my first time actually EATING hot cross buns–I’d only heard of them because of the song. It’s always the first thing you learn to play on an instrument. I have discovered that hot cross buns are delicious.
A++++ It turns out my fear of kneading was unjustified.
I sniggered….I couldn’t HELP IT!!! And honestly, I would not have bothered with the crosses either…. 🙂 So happy to hear you enjoyed these Alanna, thanks for letting me know! N xx
Hi Nagi! Lol…it has become standard practice in our house to try your recipes…can’t wait to try this one!
I too am vertically challenged…..I solved it by having one of my older sisters that is a woodworker make a wood block a few inches high with a handle space on each side (think cardboard boxes with handles you can punch in to carry the thing) and wide enough for me to stand on and be able to move around some. Makes kneading 1000% better! That way, I wan really put my weight into it!
OMG!!! I’M SO JEALOUS!!!! I actually knead on the dining table sometimes….and I even tried doing it in heels! BA HA HA!!!
hahaha…I am so klutzy I would fall over in heels……short + klutzy = disaster in heels!!
Well at least you would face plant in soft dough…. 🙂
HOW I SPENT MY MORNING
I made these buns this morning. They are delicious! I followed the recipe with one addition – a teaspoon of vanilla extract, because baked sweets need vanilla. The crosses could have been better. I think I added too much water. I will freeze a few to see how that works.
Thanks, Nagi!
( I wanted to include a photo, but I don’t know how. )
WOO HOO!!!! I love the idea of adding vanilla Yvonne 🙂 I wonder why no recipes use it??? I will double check the paste ingredients, I do notice sometimes it’s looser even though I always stick to the same measurements 🙂 I froze stacks and then microwaved to reheat them, they came out just like freshly baked!! N xx
Have you tried making the dough up to shaping, then refrigerating overnight for the second rise and baking the next morning after coming to room temp? It would make for fresh baked breakfast buns, but would it work?
Hi Yvonne! I haven’t tried overnight refrigeration with the kneaded one but I’ll come back and update if I remember to do it for my next batch. For the no-knead, again, I haven’t tried it specifically with hot cross buns, but it’s a recipe based on plain bread rolls which I refrigerate 4 – 24 hours after forming the rolls. So I’m 99.99% sure it will work great! (Thanks for the question, reminds me to give it a go so I can update the recipe with the tip!)
Love your recipes Nagi. I’m vertically challenged too, 5 foot and half an inch. I cheat by using my thermomix to knead all my bread. I usually make at least 2 normal loaves and 2 sourdough loaves a week. I can’t wait to try your hot cross buns, thanks.
Wow that’s amazing! I wish I had the discipline 🙂 I must admit I still buy bread occasionally! I do hope you try this, it is so GOOD! Nxx
When I moved to Australia it took me a while to get used to the flour/water crosses. In New England where I’m from, hot cross buns’ crosses were made with icing done after baking. They were brushed with sugar syrup and then crossed. The first time I tried that here I was quickly told I’d done it wrong.
I love the dryer idea! I use one of those heating trays that are for dishes to park before serving. I put the bowl on a towel and turn it on low. Dryer is easier I think. I wouldn’t have to get out the big tray.
I love hearing about all the different ways people make their dough rise!!! I did;t know that “other” way of doing the crosses, how interesting! The American way???
Hi Nagi, I haven’t made buns in years as when I did they were generally too heavy. But this year I tried out a recipe using Tangzhong, which I guess is technically a roux which is added to the dough. The buns (I can’t call them Easter Buns yet, too early :)) were the lightest I have ever made and kept for longer as well.
Hi Ann – wow, that’s so interesting, I learned about that recently too! I heard it was a Japanese baking technique and was fascinated. I tried it with rolls and they definitely were softer. Keen to try it out more, and I may even come back to update this recipe with that as an extra technique option!! N xx
Wow, Dozer Had too Many – platebroke Down…ha, ha,So how come I didn’t GET any. Ok, so YOU Are 1.52 cm short and IAM EXACLY 1.52 CM TALL, ONE BETTER THAN YOU, HA, HAAA. As for buns yumo! Sorry, wont be making them, just Me and noone else Wonts IT. How about YOU eMail one for me!! Thank YOU.
We’re the same height – ba ha ha!!!! WHOOT!!!
Nagi, I like big buns and I cannot lie. :-p (Had to be said!)
These hot cross buns look amazing!!! Will definitely have to make some for my neighbours for Easter. J Daddy loves hot cross buns, so he is going to be very happy about this recipe!
Ohhhhhh….I LAUGH OUT LOUD!!!! BA HA HA!!!
Nagi, these hot cross buns are stunning! I’ve never made them myself – only the bakery version. Thanks for the no-knead version – I’m terribly lazy when it comes to making bread.
I have to say that Dozer looks entirely repentant about that plate…He has that ‘sorry mom’ posture.
I don’t see any remorsefulness WHAT SO EVER!!!
ooooo i bet your house smells like a giant hot cross bun! Jealous. I need this recipe 🙂 Every attempt I have had at hot cross buns has failed miserably so here goes! They look seriously delicious Nagi xx
Hi Nagi!
Great looking buns, and I lurve hot cross buns!! I’ve been a bread baker for years and have found all-purpose flour works as well as any other for most breads, especially if you add 2 tablespoons of lemon juice per batch of bread. If you’re using a flour with no additives, it acts as a dough conditioner helping your bread to raise faster, higher, and helps to create a great texture too. As far as dough conditioners go, it’s the safest and tastiest one there is. 🙂
Poor Dozer dawg looks heart broken! If that plate was for decorative purposes, it can be “healed” with canned milk and will dry to an “almost impossible to see the breaks” finish. Sending good thoughts to you and the Dozer. 🙂
Leah!! Thank you so much for that amazing tip, I’m going to try it for my next bread! N xx
Nagi, your recipes are wonderful and your food photography is amazing. I love your blog!
Gosh thanks for the compliment Elizabeth! I do hope you have a great weekend – N xx
Hi Nagi, thanks for the great video, it’s a very helpful insight. My years have been ‘hit and miss’ with Hot Cross Buns. Sometimes brilliant and sometimes rocklike, but always edible. To prove my bread dough I have a frame that I sit inside the bed covers with the electric blanket turned on to ‘1’. Place the covered dough in this warm little spot and bingo – nice and cosy – proved bread dough! There’s another giggle.
Over the years I have always put a little Easter Egg in the middle of each bun – for the kids, you know ?
Thanks Nagi for another easy peasy recipe.
OMG I LOVE IT!!!!! I have been known to bundle my bowl up in donnas – but an electric blanket is another thing!!! 🙂 N xx
Wow Nagi, your Hot Cross Buns look DELICIOUS. With butter or jam, these are perfect for breakfast !
I always laugh when I read your posts ! Vertically challenged! haha
I didn’t know this saying until few months ago when my husband got a custom tee-shirt for my 8 year old Volleyball daughter. The tee-shirt said: Vertically Advantaged!
Have a great weekend!
BA HA HA!!!!! I am green with envy that your daughter has been blessed with HEIGHT!
Oh I am SO excited about these! They look just like store bought ones, but I’m sure are much tastier! You have saved me having to go to the trouble of figuring out myself how to make them 🙂
OMG my friends can totally attest as to just how many batches I went through!!! 🙂
Aw, poor Dozer… he looks so repentant.
I was always afraid of yeast based baking as well. Then my sister gave me her sour-cream no fail cinnamon bun recipe and voila ! I am in process of packing/moving, otherwise I would be baking these s.a.p. I have a file of your wonderful recipes and this one is going in there too. Will definitely be making in the future.
You always make me smile Nagi. I’m so happy I stumbled upon your website.
Woah! Sour-cream no-fail cinnamon bun?? *Ears perk up with interest!*
I can send it to you Nagi, no problem. I’m sure you’ll be able to test and improve it even more. Should I just type it up as a comment, or how do I do it ??
Gosh Jenny, wow, that would be stellar! Already had a reader respond to your comment hoping to get it!!! Under the Contact on my menu there is a form to send me a message and they come directly to me. I would be thrilled to try out your recipe! Thank you Jenny! N xx
I want that cinnamon bun recipe too! Pick me! Pick me!